Posts

Showing posts from May, 2022

Ailerons

Image
I had a few ideas for hinging including thread-stitched hinges, covering film, etc. Since I will be using Esaki Japanese tissue I decided to use traditional nylon hinges instead of follow the building article with iron-on film and film hinges. The tissue and dope method is one of my favorite ways of covering, it is both old-school and helps bring out the beauty of balsa built models rather then covering them with opaque film. Covering side-bar: Here's a test square I made with Esaki tissue from Peck Polymers that I purchased for the Velie Monocoupe since they have the blue and orange colors I wanted. The square is 120x100mm and the net weight of the cover is about 1gr: Back to aileron hinges. The new LE and TE for the ailerons was not thick enough for the hinges so I built out the area with two 1/16" balsa strips that will hold the hinge between them. The first layer is glued 1/16" below the top so that the second sheet is flush with the top of the rib: I marked the hing

Wing panel build

Image
Each wing panel needs to have a 1.5 degree washout that is built in with a 3/16" shim at the TE of the outer most rib. I so happens that the building magnets I use are exactly 3/16" think so this helped, and all I needed to add where a few shims along the TE. To get the washout locked into the wing shape a followed advice in an RC groups article. First, build the TE, ribs, and bottom spar on flat surface. Next, raise the structure per washout requirements and build in everything else: webbing, top main spar, sub-spar and LE. After both wing panels where complete I turned my attention to building the aileron. These had to be cut out from the built wing and rebuilt with a new LE and TE. I made sure to mark the cut lined on the relevant ribs before gluing them into the wing:

Hand made balsa ribs

Image
I decided to resigned the structure of wing panel around the rib's airfoil. Instead of the two bottom spars I opted for a conventional top and bottom spar with a sub-spar in front to share the covering and add some strength: using my CAD program I created a new 3D object of the rib with 1/8"x1/4" main spars (top and bottom) at the CG location, 1/8" square sub-spar, 3/16" square leading edge, and a 1/8"x1/2" trailing edge. The CAD files can be downloaded from GrabCAD here . I printed the template pair on my 3D printer using PLA and used them as a sanding template for creating two stacks of ribs for the two wing panels: Preparing the stack with 1/16" light balsa: The stack after sanding and cutting slots for spars: Finished rib set for one wing:

Empennage

Image
I am moving on to the tail section. This will turn my attention to the next complex building task as wel as complete another area of the fuselage that will help assess overall weight and CG for balance. The tail section is built out of laminated balsa, something I have never done before. I consulted several good YouTube tutorials and a friend at the club. I started out with building the templates from foam (two layers glued with Elmer's glue) that were accurately cut according to the plans: I wrapped the template with clear plastic (Saran Wrap) and pinned it to my building board. I soaked five strips of 1/32" thickness balsa cut to 5mm wide in boiling water for about 20 minutes and wrapped them around the template with PVA wood glue between the layers. I let this dry for 24 hours: After the glue was thoroughly dry I unpinned the lamination:   Now I can build the fin and rudder strictures: I repeated the same lamination steps for the two laminated sections of the elevator and h

Fuselage, part 3

Image
Firewall and Turtle Deck are the next parts to fashion and glue. The fire wall was a redesign because I extended the nose section by 1/2" and the plans are build for a nitro engine. I drafted it according to the new nose opening dimensions and added and opening for motor wires and cooling air. Once the fire wall was glued in place I designed the turtle deck sheeting. I used thin poster board cutouts to figure out the final shape and after a few iterations cut the 1/16" balsa sheet to fit (before gluing the turtle deck sheets I traced and glued the "instrument panel" semicircle): Instead of filling the front section sides behind the fire wall with 1/8" sheet I decided to use small segments of 1/8" balsa and stick to frame the area.  The front section after some light sanding: At this stage with the added frame members and 1/8" sheeting behind F3 the fuselage structure weighs in at 46 grams (1.6 oz):

Fuselage, part 2

Image
Now that I have the two matching fuselage sides I started to plan the structure. I've never built such a structure before the part that seemed difficult was creating the sharp breaks in the longerons.  I started with preparing the two main formers, F2 and F3. Instead of 1/8" ply I used 1/16" and reinforced the top and bottom with a 3/32" hard balsa strip: For the initial structure setup I followed the build article and carefully cut the longerons behind F3 and in front of F2. Then lined up the sides, top-down, on the plans and glued the former:   Once the glue cured I pulled in the back of the fuselage and then the front over F1, which I cut from 1/16" ply and hollowed to allow room for the battery. I took the precaution of wetting the doublers before attempting to bend the fuselage sides, this allowed the longerons to have a sharp bend while maintaining flexibility of the 1/16" doubler sheet: I filled in the notches in the longerons by gluing in thin balsa

Fuselage

Image
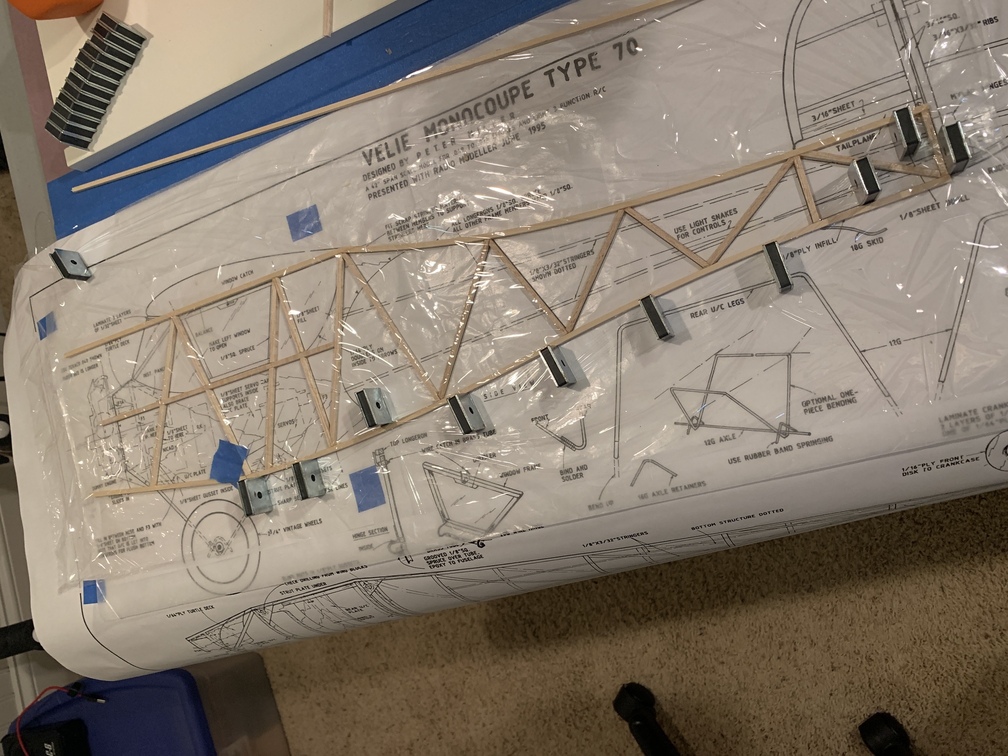
I was not familiar with this type of fuselage structure and building process. Every RC plane I've built so far has a simple box fuselage built with flat balsa sheet sides over formers, with more sheets covering the top and bottom. The Chicken Hawk was only a slight deviation from this method. I typically start by building the wings, but this time I went for the fuselage first. It will help put the challenging piece behind me much sooner and perhaps also help with figuring out CG and balancing; something I can do with a complete fuselage and tail section in place. I'm not sure about that but it seems like a reasonable expectation. Learning an important lesson from building the Chicken Hawk, I carefully read the building article and building log on RC Groups. My plan is to follow the more experienced builders' methods and adapts I progress. This is the first side structure that was built on top of the plans. Wax paper separates the structure from the plan and clear plastic w